Even though Android has over 70 built-in views, in many cases you'll want to have something that's not part of the SDK.
Using open-source libraries found on GitHub can do the trick from time to time but it's rare to find something that does exactly what you want and that is not buggy.
Luckily, Android provides many ways to create custom views and it's not even that hard to do! In this example, we will make an animated semi-circle that displays progress.

The entire code is available here if you don't want to read the whole thing.
Let's start!
Create a new class that extends View
First you need to create a class that extends View. You can implement numerous different constructors but the most important
one if you want to create your View from XML contains 2 arguments: a Context and an AttributeSet.
public class SemiCircleView extends View {

    public SemiCircleView(Context context, AttributeSet attrs) {
        super(context, attrs);

    }
}
The AttributeSet contains the collection of attributes that you will get from the XML tags. We'll come back to this later in more detail.
Overriding onDraw()
onDraw(Canvas canvas) is the method that will be called every time your view needs to be drawn or redrawn. The Canvas object contains all the methods to draw lines, text, etc…
@Override
protected void onDraw(Canvas canvas) {

    // Will call canvas.doSomething()

}
Define our drawing objects
We want to create two semi-circles on top of each other: the one in front will be animated, the one in the back will be the rim.
We need one instance of each of the following objects for each semi-circle : Path, Paint, RectF.
Path let us define lines and curves with coordinates.
Paint defines how we draw those shapes: color, style, etc…
RectF is a rectangle inside of which we will draw our arc.
For now, let's just instantiate the objects we need for the rim.
private Path rimPath;
private Paint rimPaint;
private RectF rimRect;

public class SemiCircleView extends View {

    public SemiCircleView(Context context, AttributeSet attrs) {
        super(context, attrs);

        rimPath = new Path();
        rimRect = new RectF();
        rimPaint = new Paint();
        //This will draw the contour of our path (easier to see what we're drawing), we'll switch to Style.FILL later.
        rimPaint.setStyle(Paint.Style.STROKE);
        rimPaint.setColor(Color.LTGRAY);
        rimPaint.setAntiAlias(true);
    }
}
Override onSizeChanged()
This is where we will define our shapes based on the height and width of the View.
onSizeChanged(int w, int h, int oldw, int oldh) has 4 parameters : w & h are the current width and height. oldw & oldh are the previous one.
Read the comments carefully to understand the logic behind the drawing:
@Override
protected void onSizeChanged(int w, int h, int oldw, int oldh) {
//Set the thickness of our circle to 1/8 of the width
thickness = w /8;
//makes the current width available to our other methods
width = w;
// Set the Rectangle coordinates to a square of size w*w (in order to have a circle shape)
rimRect.set(0, 0, w, w);
//This makes sure the Path is empty
rimPath.reset();
//Start our path at x=0 (left side) and y=w/2 (middle of the height of the square)
rimPath.moveTo(0, w/2);
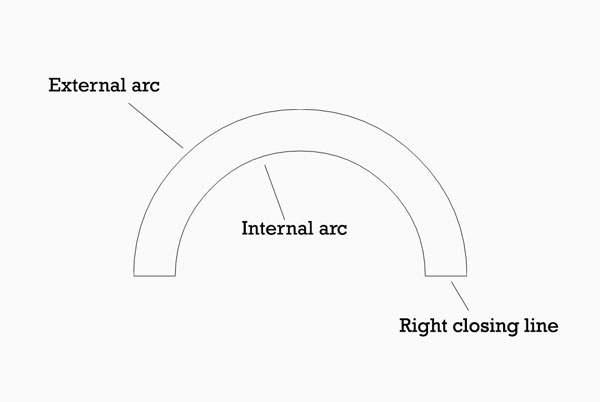
//This draws the external arc inside our RectF object, starting at 180 degree and moving 180 degree clockwise
rimPath.arcTo(rimOval, 180, 180);
// This draws the right closing line of our semi-circle
rimPath.rLineTo(-thickness, 0);
// This moves the sides of RectF inward
rimOval.inset(thickness, thickness);
// This draws our internal arc using the new size of our RectF object, starting from angle 0 and moving 180 degree counter-clockwise
rimPath.arcTo(rimOval, 0, -180);
// This draws the left closing line
rimPath.rLineTo(-dx, 0);
}Draw the path in onDraw()
@Override
protected void onDraw(Canvas canvas) {
        canvas.drawPath(rimPath, rimPaint);
    }
Now you should have something like this:
You can now change the style to FILL in rimPaint.setStyle(Paint.Style.FILL), this will fill the drawing with the previously chosen color.
Now let's animate!
Create 3 new objects : Path, Paint, RectF for the front semi-circle but set a different color in the Paint object.
private Path frontPath;
private Paint frontPaint;
private RectF frontRect;

public SemiCircleView(Context context, AttributeSet attrs) {
        super(context, attrs);
        //....

        frontPath = new Path();
        frontRect = new RectF();
        frontPaint = new Paint();
        frontPaint.setStyle(Paint.Style.FILL);
        frontPaint.setColor(Color.CYAN);
        frontPaint.setAntiAlias(true);
    }
We're going to use these for the animation.
First you need to implement the ValueAnimator.AnimatorUpdateListener interface and to override its onAnimationUpdate() method.
public class SemiCircleView extends View implements ValueAnimator.AnimatorUpdateListener{
    @Override
    public void onAnimationUpdate(ValueAnimator animation) {
        //Do something
    }
}
A ValueAnimator is a simple object that changes a defined value over time, the AnimatorUpdateListener is then called every time this value is updated.
You can now set and start the animation in a public method that you will later call from your Activity or Fragment,
let's call it startAnim().
private ValueAnimator mAnimator;

public void startAnim() {
        // sets the range of our value
        mAnimator = ValueAnimator.ofInt(0, 180);
        // sets the duration of our animation
        mAnimator.setDuration(1000);
        // registers our AnimatorUpdateListener
        mAnimator.addUpdateListener(this);
        mAnimator.start();
}
Finally we can implement the code inside onAnimationUpdate():
@Override
    public void onAnimationUpdate(ValueAnimator animation) {

        //gets the current value of our animation
        int value = (int) animation.getAnimatedValue();

        //makes sure the path is empty
        frontPath.reset();

        //sets the rectangle for our arc
        frontRect.set(0, 0, width, width);

        // starts our drawing on the middle left
        frontPath.moveTo(0, width/2);

        //draws an arc starting at 180° and moving clockwise for the corresponding value
        frontPath.arcTo(frontRect, 180, value);

        //moves our rectangle inward in order to draw the interior arc
        frontRect.inset(thickness, thickness);

        //draws the interior arc starting at(180+value)° and moving counter-clockwise for the corresponding value
        frontPath.arcTo(frontRect, 180 + value, -value);

        //draws the closing line
        frontPath.rLineTo(-thickness, 0);

        // Forces the view to reDraw itself
        invalidate();

    }
Now you can draw the front semi-circle in onDraw():
@Override
protected void onDraw(Canvas canvas) {
        ...
        canvas.drawPath(frontPath, frontPaint);
    }
Adding XML attributes
Remember the AttributeSet object in our constructor?
Well, this is what allows us to style our View directly in our XML Layout.
Let's see an example of changing the color via an XML tag.
First, declare your styleable attributes in values/attrs.xml:
<resources>

    <declare-styleable name="SemiCircleView">
        <attr name="colorFront" format="color" />
        <attr name="colorBack" format="color" />
    </declare-styleable>

</resources>
Now you can use these attributes in your layout to define your colors :
<yourpath.SemiCircleView
        android:id="@+id/view"
        android:layout_width="200dp"
        android:layout_height="100dp"
        app:colorFront="@color/colorAccent"
        app:colorBack="@color/colorPrimaryDark"
    />
Finally, you can retrieve the attributes in the View constructor and use them to set colors in the Paint objects:
private int mColorFront;
private int mColorBack;

public SemiCircleView(Context context, AttributeSet attrs) {
    super(context, attrs);

    TypedArray a = context.getTheme().obtainStyledAttributes(
            attrs,
            R.styleable.SemiCircleView,
            0, 0);
    try {
        mColorFront = a.getColor(R.styleable.SemiCircleView_colorFront, Color.CYAN);
        mColorBack = a.getColor(R.styleable.SemiCircleView_colorBack, Color.LTGRAY);
    } finally {
        a.recycle();
    }
    ...

    rimPaint.setColor(mColorBack);
    frontPaint.setColor(mColorFront);
    }
I hope this tutorial helped you in understanding how to create custom views. Have fun experimenting with it!
Full code available here.